MY CURRENT UPDATED MAKEUP ROUTINE & FAVORITES [2023]
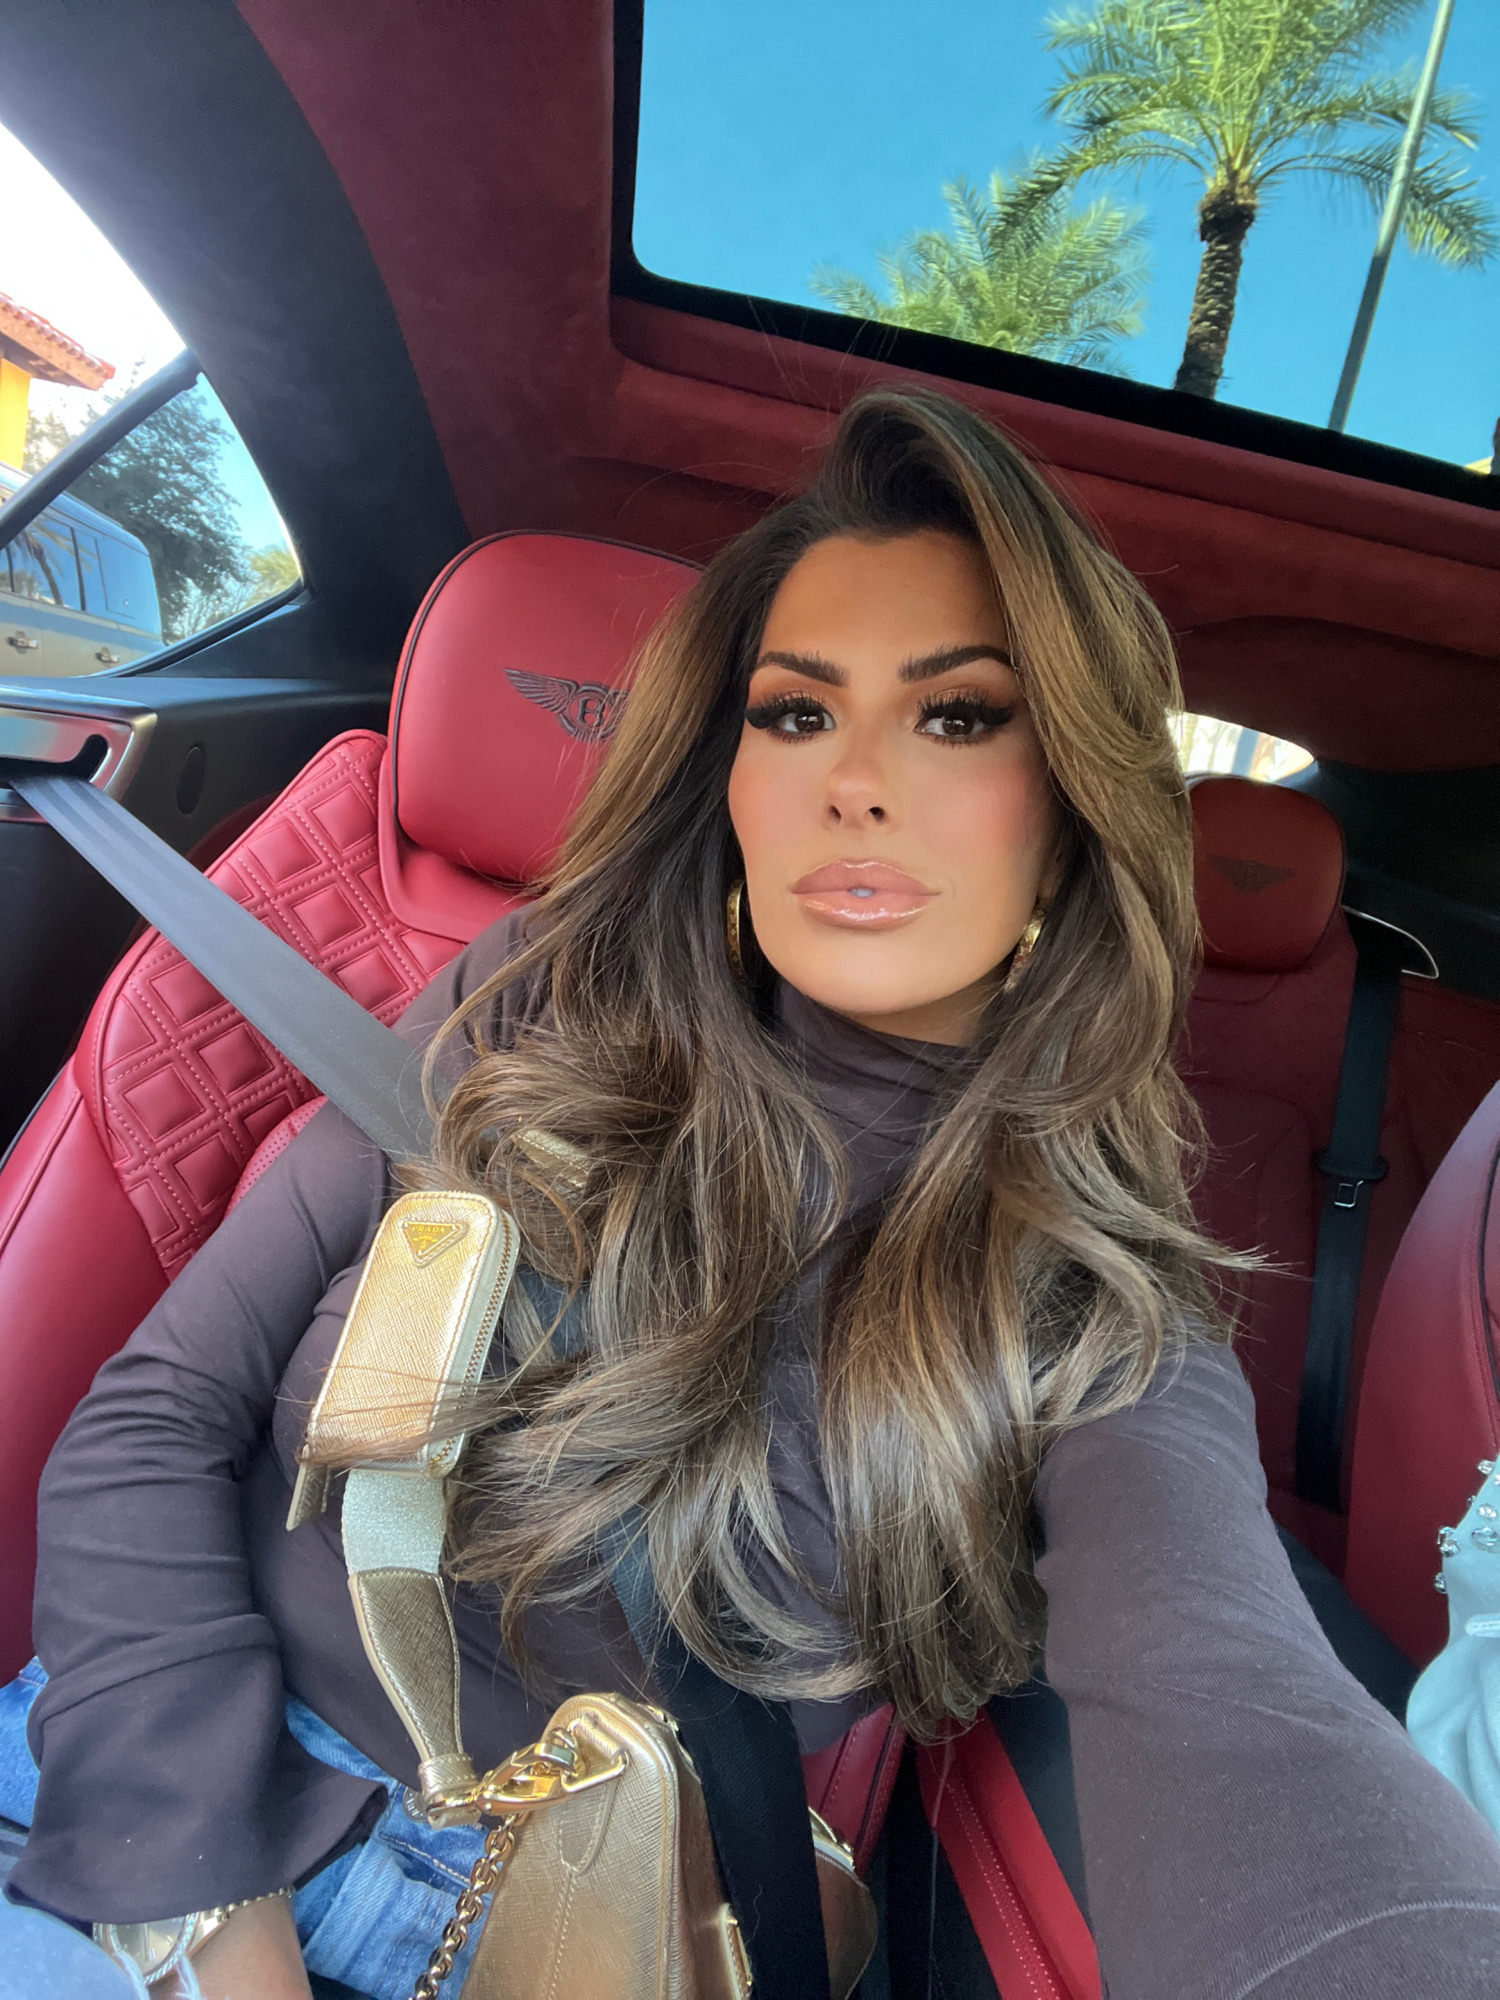
Okay, so I have not done my updated makeup routine post since fall of 2021.😱 There’s a good reason for this though, I promise! I try new makeup SO often that if I do switch a step up- I end up sharing that new product on my stories and hoping you all are following there to see the routine as it evolves. Now, I will say that the last month or two I have been asked for a updated blog post with all steps and I feel like this a really good time to just journal each step and break down my favorites…. so here we go!! Make sure you are checking my Insta-stories & TikTok for tutorials of me doing this step by step in case you want to see it in action!@EmilyAnnGemma on IG & EmilyAnnGemma5 on TikTok. Also, I do monthly Sephora Faves hauls on my blog and stories so always check there to get access on updates.
1. PRIME
Primer is a huge deal for me- seriously I am a great judge for a good primer. Of course good skincare is the biggest key but a good primer can take your makeup look to another level. For the last 10 months my number one favorite primer is HERE. It is INCREDIBLE. I’m a dry skin gal but I do have oily spots here and there and this keeps the oily spots at bay. It also LOCKS your makeup on– seriously it holds and grips onto your makeup like magic! The biggest kicker of all is that I find that it really helps smooth out texture and blur pores – that is where I really got sold on it! If you remember, in my last routine from 2021 – I swore by THIS PRIMER– that blurs like a dream however you have to pay and arm and a leg for it! So I prefer spending my cash on good skincare and use THIS primer. Another primer I have really loved is THIS one and it also does a beautiful job of blurring out pores and smoothing texture as well.
2. UNDERPAINTING
Okay, this step is… really just all technique & it is the technique I used for my makeup in the photos above… If you want really smooth, flawless makeup & have 35 minutes on your hands the next step is to CONTOUR. YES- applying contour before foundation or concealer. This is a technique used by makeup artists like Scott Barnes [J.Lo’s artist] & also Mary Phillips [Kendall Jenner’s artist]. So, my top 2 contour predicts are HERE & HERE. In the Mario contour I wear shade ‘medium-dark’ & in the Tarte contour I wear shade “warm bronze”. Both are truly amazing & are easily considered my holy grails as they both blend out so neatly & don’t leave you looking dirty/muddy, ya know?!. For the Mario one, I apply a good amount to my hand and let my body’s warmth kind of melt it. I take THIS brush– [the large end] and blend it in to define cheekbones, jaw, & forehead. I use the small end of the brush to contour my nose & my lips- you can use any small brush you’d like but I like traveling with the double ended brushes because it keeps it simple. I lightly swipe down my nose to make it appear slimmer or more narrow. I’ve never had any sort of plastic surgery on my face – I have been asked often if I had a nose job and I credit the contour for that look! With the lips, if you contour those it just gives a shadowy appearance so they look fuller! Now, there is no need to blend it in perfectly since we are going to apply concealer and foundation on the top of this- keep that in mind. If you are more of a beginner in terms of makeup- I definitly recommend the Tarte as it is just so simple & user friendly. Both are incredible products though- and both work just as well on top of foundation.
3. CONCEAL
Now- there are TWO really amazing concealers for this step- THIS one [Shade: ‘NN30’] & THIS ONE [shade: ‘4’]. Both are incredibly full coverage products that wear long term, stay put, and don’t get creasy [ideal for dry or mature skin].. Now, neither of them are my holy grail for under the eye specifically– but they do work there if you want a simple routine but I find that both are incredible for the ‘underpainting’/Mary Phillips technique. I use these concealers to *highlight* & to cover problem spots. I use them down the center of my nose [helps with contour], between my brows / lower forehead, cheek area where I have a lot of veins that show, and my upper cheek area where I have some dark spots. I use a *dampened* beauty sponge to blend all of this concealer out. I use that same sponge to kind of melt together the cream bronzer. This absolutely doesn’t need to be perfect because the next step will really bring it all together – I promise!
4. FOUNDATION
Okay, so this is where the Mary Phillips technique really differs from Scott Barnes. Since we used a full coverage concealer prior to foundation, there’s no need for any heavy foundation. The dampened beauty sponge soaks up the extra concealer so for foundation I *LOVE* the way this finishes. I use THIS foundation [shade: ‘Barcelona’] & dip a fluffy powder brush into it and just lightly buff it in. This foundation is a thin, lightweight foundation with minimal coverage & it is extremely light but BEAUTIFUL. When you combine a fluffy powder brush & this-it just melts the entire look together. I can’t explain how BEAUTIFUL it can make your skin look. You are using minimal product and get maximum result. It’s just glowy & gorgeous!! Now, if I were not doing the Mary Phillips ‘underpainting’ technique – I would use THIS foundation [Shade: ‘8’] – it is a little bit more coverage but still lightweight and fresh. It wears long term and simply looks amazing. My two favorite foundations brushes are HERE & HERE.
5. EYE SHADOW
Okay, so I like to let my foundation set for a minute and I do my eyeshadow. I have done the same eyeshadow look for over 5 years- it’s so boring! However, I get people asking for videos every week. I LOVE THIS palette – it is so good and will last a long time. The camel and brown shades are exactly what I need. I use a tan/camel shade with THIS fluffy brush [hands down one of the best crease brushes EVERRRRR!] in my crease as a transition shade. Next, I use a brown shade with THIS BRUSH and focus only on the outer corner- doing so very lightly! I use that same fluffy brush to blend it all together. Next, I do a glitter / shimmer on my lid- if I am really wanting to be glam! Now, this palette has an amazing shimmer shade that is gorgeous on the lid – especially if you wet it with THIS. It will appear really metallic and bold. 50% of the time I use that shade but for a special occasion I use THIS liquid gold [Shade: ‘Champagne Showers’] – just a dot on my lid and then I use a shimmer on top. It just really pops and looks amazing and unique. When I am done with my eyeshadow, I always clean the edges of the eye off with a makeup wipe. This helps keep your eyes from looking droopy- which is super important!
6. UNDEREYE CONCEALER
This step is very important to me as I do have dark circles around my eyes [mom lifeeee]. One of the of my holy grail items for under the eyes is THIS color corrector [Shade: ‘Medium’]. It has some magical product that literally blurs & smooths your underlies while also instantly brightening the darkness. I’ve sworn by this product for over 3 years now and I can’t find anything that beats it. Since that is really just a color corrector I do still apply concealer on top – just the tiniest bit in the inner corner since I didn’t apply anything there in step #3. The concealer I have repurchased the most the last 8months has been THIS one by Huda Beauty in shade “Coconut Flakes’. I find that it wears well on dry skin & nature skin. Prior to discovering this concealer- I used THIS one for YEARS and I have my mom and sister obsessed too! It really is so amazing for dry skin, mature skin, etc. Both concealers blend out beautiful, wear long term, & don’t crease or make your under eyes look crepey. I blend this all out with a beauty sponge – the sponge will absorb any extra product without soaking up too much of the product!
7. SETTING POWDER
This step is pretty simple – I set my face with THIS setting powder [shade: Satin Blanc] – which has been a part of my routine for a couple of years. It is simply amazing. I just apply with THIS dampened beauty sponge. I use this brush to sweep off any excess powder!
8. BRONZER
Now, I personally feel like the fun starts here!☀️ My all-time favorite bronzer since 2016 is discontinued and can be VERY hard to find…😭 When I realized it discontinued I did buy backstock in it HERE & HERE. I use an old Armani brush to apply it but THIS BRUSH is similar and would work the same exact way. This gives an overall warmth to your face and really brings your makeup to life.
This may sound crazy but I also use THIS bronzer & with THIS brush to stamp bronzer through my hairline & down my nose. I realize this second step sounds crazy but I don’t expose my face or head to the sun – nor do I apply self tanner so I am a totally different color. I will say that this just does the trick for me! Both bronzers nentiuoiend are amazing and are dark enough for my dark self tanner.☺️ The first step is a matte bronzer and it just brings warmth to my face but the second bronzer is a darker one that gives me depth and has some ‘sheen’ to it so it really just brightens up the bronzed look.
9. BLUSH
Okay, blush could be one of my other favorite steps. Right now I am SOOO obsessed with THIS blush [shade: ‘Golden Hour’] – it is blurring and so gorgeous! But for the last 6 months I have also been using THIS blush [shade: ‘French Rose’]. Both are really, REALLY good blushes, I try out every blush and bronzer on the market and none compete with the ones I am mentioning in this post.
10. HIGHLIGHTER
I have a few highlighters I really like so I’m going to narrow it down to my top 3. Right now I am loving the new Rare Beauty one [shade: ‘Exhilarate’] but it is next to impossible to get your hands on unfortunately. But two of the best that I always go back to are HERE & HERE [shade: ‘Cookie’]. Both are really gorgeous and don’t emphasize texture – and they also last for a very long time. The brush I use to apply highlighter to my cheeks is a really old, cheap one and people often ask about it- the most similar I can find is THIS ONE. When I use highlighter on my nose, cupids bow, & inner corner I really like using THIS brush – it helps get the product in the precise place.
11. BROWS
I truly believe brows will change your entire face & look so PLEASE do not miss this step! I use THIS brow powder [shade:’Medium Brown’ ]to quickly fill in my brows where I have sparse spots or need evening out. It’s an easy product to use and you really can’t mess up with it. I also always keep THIS pencil on hand to fill in any area that looks extra sparse bc the pencil has fibers on it and makes it look more natural. My favorite step of ALL is brushing my brows up with a laminating-like gel! One of the best is the ABH Brow Freeze but I scored THIS dupe on Amazon for half of the price and it works just as well! 🤷🏻♀️
12. EYELINER
I don’t wear liner on top every day but when I do I use THIS ONE and it is easily one of the best on the market!! ITS AMAZING. Now, I do wear lower waterline liner DAILY and the best on the market is still THIS ONE – it is the only one that is truly waterproof… I know this bc of my year round allergy problem!
13. UNDEREYE MAGIC TRICK
IYKYK⚠️… this step just seals the deal for your under eye area. You do not have to do this but I do this because not only does it brighten my under eye and make it waterproof – but it has SPF [w/no flashback!] This product on its own [shade: Summer Bisque] is amazing. For over 2 years now my DMs go crazy anytime I show that the triangle brush is back in stock! This step allows you to clean up nose contour & lock down the undereye area which is amazing in the heat & if you have watery eyes like me!
14. SETTING STEPS
I use setting spray to lock down my makeup and melt it all together and make it less powdery. THEN! I use a makeup puff & THIS ‘magic’ powder to quickly and lightly blur away ALL pores and ALL texture…. ANDD! To matting any oily spots. This step is essential to me- I can not recommend this highly enough. Anyone who’s tried it always comes back to me raving about it. I find that my makeup totally changes after I press this powder into my face. It’s not heavy and has zero coverage but it just makes your face so soft and smooth!
15. LIPS
For my liner I like THIS one in ‘Deep Taupe’/’Raisin’/’Hazelnut’ & THIS one in the shade ‘Toasty’. Both of these are kind of a dark brown liner that looks amazing for a nudey-pink lip. This shade enhances the border of your lip and makes them look larger. For the 200th year in a row now[😅], my #1 favorite lipstick is still THIS one in the shade ‘Kim KW’ as it wears well, isn’t dry, and is the perfect nude/pink. As for gloss, I really love THIS one in the shade ‘You Are The Sun’.
16. MASCARA
This mascara is an old one but I am still obsessed. I also love this one and this one.

Love your beauty blog posts!!! Never get tired of reading them!
Aw you are so sweet, thank you!
time for me to do a sephora haul!!! lol
Yay! My favorite thing to do 🙂
UNDEREYE MAGIC TRICK- when you go to the qvc link it is sold out and you can’t see what the product is. Can you please share so I can look for it elsewhere? Thank you! 😊
I love all your makeup and skin care recommendations!
What shade on the sigma palette do you use for your shimmery lid?
I change it up all the time! I use them all!
Where do you put the foundation? On top of the contoured area? Or avoid those areas?
Check out my IG highlights for all my makeup tutorials! http://www.instagram.com/emilyanngemma
The link for your under eye magic trick does not work and I am dying to know. Thanks!
Thank you for this! I love watching your stories but love the posts even more 🙂
Thank you so much!
Hi….I am wanting to know so badly about #13; but the link takes you to QVC and it says sold out without any product information. Can you provide some details please:)
#13 IYKYK… this step link to QVC does not sell item or tell us what the item is. Please tell us! 🤞🏼🙏🏼💚
It was for the triangle brush but it’s no longer available!