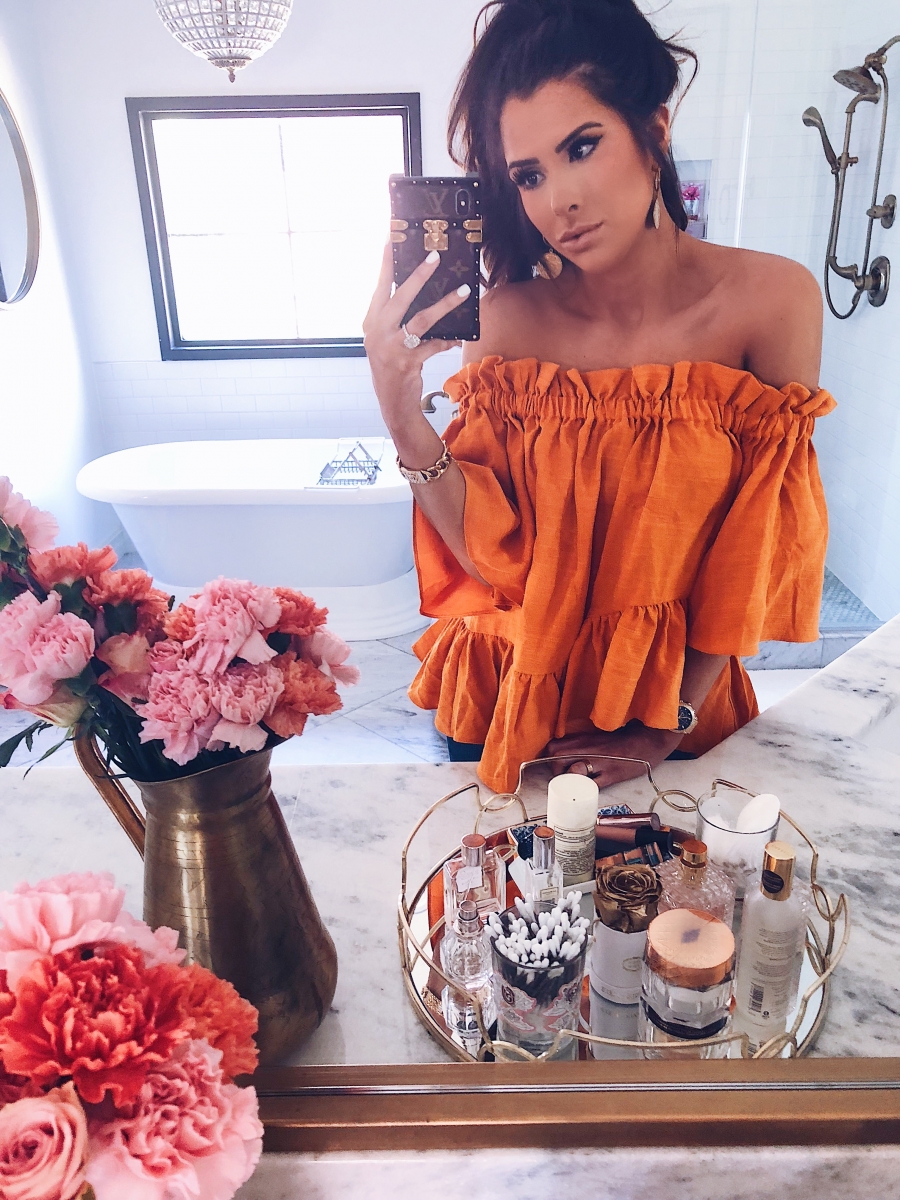
MAKEUP USED FOR THE PHOTO \ RECENT IG STORY TUTORIAL
#1. I mixed two foundations, which is normal for me to be honest. If you watch popular beauty gurus on YouTube, you’ll see that it is kind of a ’thing’. You totally do not need to mix foundations – it is not necessary at all. However, I have 4-5 foundations that I love and swear by and depending on the day and on my skin, I will mix a foundation ‘cocktail’ if you will. Weather is a huge factor for me skin so here in Oklahoma we have had sunny, hot days this week and a few days in the 40s that were so cold and dry. That being said, my skin has been all over the place and I’ve had to be on top of my skincare! Now, before I go on, let me clarify that using two foundations doesn’t mean extra makeup or lots of makeup – it actually can mean using LESS. That is why I do it! So, if I have some dark spots or see melasma coming through, I’ll use a tiny bit of full coverage foundation on them, but then use a light, luminous foundation on the rest!
So the last couple of days I’ve gone back to my favorite Hourglass Foundation! This is a full coverage, long wearing foundation and it wears well on just about any type of skin — which is why I LOVE it! Whether you are super oily or super dry, you can use this foundation. It is not cakey or thick, it has a light feel to it – although it is buildable in case you need extra coverage. [I am wearing ‘warm beige’ in this right now, I get nervous to share shade info because my skin can be super tan and super pale based on if I’ve been in the sun or if I’ve used fake tanner! This is a dark shade for me.] I make a few lines on the places on my face that need it and then I added a very small pump of this foundation on to my blending brush. I blend in circular motions all over my face and then I use a damp beauty blended to pat it in and pick up any extra product so that it is not cakey or thick! I have found that using a brush does give you better coverage but if you want your skin to look a bit more luminous and natural, go back over it with a damp Beauty Blender to pick up excess product and melt it all down. [My favorite BB is the black or the nude – I don’t like the pink as much, lol!]
PS. Prepping the skin is super, super important. I have dry skin so I am thorough in my priming / prepping. I usually use a Smashbox Primer Water or the Philosophy Hydrating Mist [both are hydrating]. *MY BEAUTY TAB HAS ALL INFO ON SKINCARE/MAKEUP. ALL SHADE INFO & OTHER PRODUCTS ARE LINKED IN THOSE POSTS* THIS oil by Drunk Elephant one of my holy grail oils I use before applying make-up is – it is SO good and lasts a while.
#2. For my under eye area I used this concealer. A little goes a very long way so start off small! I use my damp Beauty Blender to blend it in and pick up excess product. Next, I used this palette – this palette is a key product. I use the two lighter shades to brighten my under eye area. I swear by a bright under eye area – I think it makes everyone look so much better and awake! *I will be back this week to show you all how I brighten my under eye area!!* Next, I use the Peach Perfect Mattifying Setting Powder to ‘bake’ quickly under my eyes and around my jaw line. This is the powder I raved about in Friday’s Sephora Haul post. I am obsessed!!
#3. I used the same palette as above to contour my cheek bones & my nose. Contouring my nose is probably one of my favorite makeup steps – it changes your face completely. I get asked frequently if I have done something to my nose and I absolutely have not! My nose is not perfect or small – but who wants perfect? A little bit of contour can totally improve the look + I love when I see women embrace imperfections and be confident. I recently tried a new way of contouring my nose and I thought it looked good but when I saw a photo of it I was like ‘noooooooooooo! Never doing that again!’. Ha! I only say that because you really do need to experiment – every nose is different so what I do may not work for everyone.
#4. I used the Huda Beauty palette on my eyes. No fancy technique, just a light brown shade in the crease and a glitter on the lid. I used my Stila Eye Liner on the upper lid to give a cat eye and then my IT Cosmetics Superhero mascara – its my favorite currently.
#5. Next, are brows! I use this pomade to fill in sparse areas. Pretty simple! [*Again, all shade names and info are in previous posts!*]
#6. Finally, I mixed two NARS blushes from a palette & then popped on Fenty Beauty Highlighter. I always set my face really, really well. Spraying a setting spray at the end and fanning it dry is what melts it all into ‘one’, lol! If you are wearing powders on top of liquid foundation, you’ll want to always set your face to make it more skin like and fresh! If you like super glowy, dewy look – use THIS spray. Otherwise I’d recommend Mac’s Prep + Prime Fix+… OR just use the two I mentioned in step #1. 🙂
#7. LIPS! First, I lined w/ Estee Lauder’s Lip Liner which is super good! I used the shade ‘Mauve’? I believe. Next, I used this $8 lipstick in the shade ‘Somewhere in Spain’ and then I used ‘Fawn Over Me’ as the gloss. This is the same gloss I am always raving about!
In my IG-Story I did on Friday, I shared a quick tutorial on how I use my new Holy Grail dry shampoo that I raved about in that days blog post. My hair was on day 6 of not being washed so I wanted to show you all how easy it was to make it look clean and fresh despite being ‘dirty’ If you don’t watch my IG-stories, I’d recommend checking them out as I do update them every day and I am always sharing quick videos/tutorials and tips and tricks! It’s a really easy way to follow me and see exactly how an outfit looks or what make up I am wearing that day. My instagram handle is @emilyanngemma and I recommend going through and liking 10 or so recent images and commenting on some so that my stories will pop up at the top of your feed. Otherwise you may never see my content as the algorithm has it hidden from a large part of my audience!
Also, I do save many important stories it my HIGHLIGHT tab on the bio of my Instagram. I have tabs for hair, makeup, #ootds, etc. I did save parts of the dry shampoo tutorial to the HAIR HIGHLIGHT TAB! 🙂
*VIB SALE DOES END MONDAY*
ITEMS USED IN HAIR POST ARE LINKED IN FRIDAYS POST BLOG.


Gorgeous! Love all the tips! Do you use shade 3 in that CONCEALER? I feel like it is always sold out but I don’t have a store close by so I want to make sure to order the right shade when its in stock. Thanks girl! Love reading your content!
Yes! I have 2 and 3 and love them both!
You look so pretty, thanks for sharing your makeuo routine. I have been wondering about it when I see your images on instagram and see your makeup is always on point.
https://esraasheaven.com/
Thank you so much!
What nail polish is your favorite?
I wear dip colors mostly!
Your makeup always looks amazing! <3
BlondieintheCity.com
IS this pretty much the makeup you wear all the time? love it! also it doesn’t say on the website but what color is that lipstick?
Its similar to my daily routine! I switch my makeup up regularly just because I am always trying new products! 🙂 The lipsticks are linked and the shade names are listed as well in $7!
what color is your nail polish?
Pl t me w kind of eyelashes you use? Thanks
I get lash extensions!
Morning, the $8 lip stick “somewhere in spain” link doesn’t work. ??? i found it On my own, but it was $25. ThE combO with the pink lip liNer, on your ig tv, looks sooooo good.